First let me say, I did not invent WickRock. It has been around for a very long time. I only discovered a new use for a common material and gave it a catchy name that fits the function.
I only actually discovered its potential use for this application on 1/12/2020 while looking for something else. When I found what I was looking for, the prototype WickRock was staring at me from eye level, saying TRY ME!
First photo showing 24 hrs comparison of sowing dry seed onto prototype WickRock ON 1/12/2020. The prototype is sitting in a shallow bit of water in a plastic cake pan. The untouched WickRock surface does not visually appear to be wet but each seed sits in its own tiny puddle, soaking up what it needs to expand and germinate while also in air contact.

Three full days after dry sowing. Up to this point, the seeds were covered with a circle of tyvek which was cut from a priority mail envelope to fit the disc size. Tyvek is great for providing protection, raised humidity when required and still allowing to breath.
The fourth day photo below has a pretty good view of the prototype. It's an
over-a-year old gypsum disc, custom molded to fit on my pottery wheel. It has been fairly abused by wet/dry cycles, scraped, gouged and washed with a wet rag while spinning. Think it will handle a few microgreen grows?


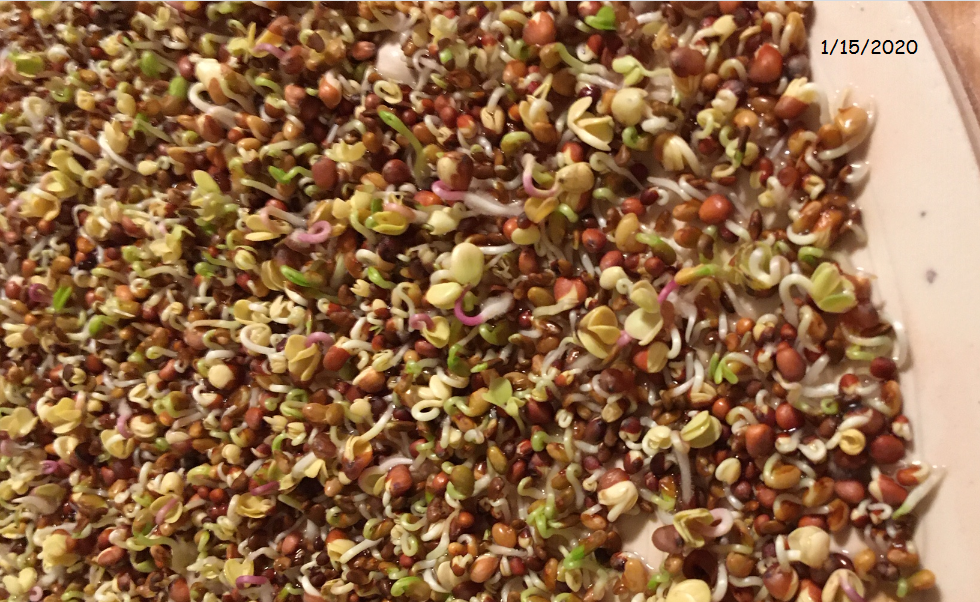
The sixth day after dry sowing below.

What is WickRock?
I have written many times that WickRock is a particular type of Gypsum. This is the truth but not the whole truth.
Gypsum plaster, or Plaster of Paris, is produced by heating gypsum to about 300 F.
When the dry plaster powder is mixed with water, it re-forms into gypsum. A large gypsum deposit in Paris led to calcined gypsum to be commonly known as Plaster of Paris.
Effect of Overexposure-Chronic Hazards: Contains Crystalline Silica which has been determined to be carcinogenic to humans (1) by IARC when in respirable form. Click here to view the entire Safety Data Sheet.
Read and Follow all product label safety cautions and recommendations when working with this product!
Other than breathing in Plaster of Paris in its powder form, there are no concerns I am able to find concerning the finished gypsum form. Gypsum is commonly added to farm and garden soils as an amendment that improves moisture holding and fertility.
WickRock Gypsum is made from DAP brand Plaster of Paris, available at most any Home Depot: DAP Model # 10312.

You're about to learn exactly how to make a 1/2" thick slab of WickRock, molded into a standard 1010 tray. Just double it for a 1020 but it's easier to work with smaller amounts for the kitchen cabinet mold maker.

You're about to learn exactly how to make a 1/2" thick slab of WickRock, molded into a standard 1010 tray. Just double it for a 1020 but it's easier to work with smaller amounts for the kitchen cabinet mold maker.
It's important to use DAP brand because I've been using this particular brand for over 30 years in various art projects and have tried many others. It's better than other commonly available gypsum "Plasters of Paris" for this application. Most gypsum objects made from inferior plasters will crumble when wet, such as sheetrock, AKA Gypsum Wallboard. Most all cheaper hobby plasters will also fail quickly.
There are some more costly gypsum cements and plasters that are more dense and may work as well or better for this but they are not usually a common local purchase for most and will cost you double the price to get them delivered. This is why I have chosen to teach you how to do this rather than produce, sell and ship them myself. The end cost would just be prohibitive for most folks.
DAP Plaster of Paris weighs approximately 1/2 pound per cup. Dry weight of the finished WickRock will be the same as the dry weight of the powder form.
DAP Plaster of Paris weighs approximately 1/2 pound per cup. Dry weight of the finished WickRock will be the same as the dry weight of the powder form.
They are fragile but not as fragile as some things. Just keep in mind they aren't plastic and don't drop them. Another reason I cringe at the thought of shipping, I worked as a mail carrier for awhile and know full well "FRAGILE" stamped all over a box means nothing to many postal workers.
My material cost for DAP Plaster of Paris comes to about $1.40 per 1010 tray size slab of WickRock Gypsum when purchased in the 25 lb bag. Your cost per may vary.
If you've done many microgreen grows, then considering WickRock is a reusable media, many times over, this should be worth your time and means more money in your pocket if you grow microgreens to sell. You might even go into business selling slabs of various sizes. It's just not my thing. I hesitantly say if you just can't do it for whatever reason and just have to have some WickRock slabs, contact me and we'll discuss it.
If you've done many microgreen grows, then considering WickRock is a reusable media, many times over, this should be worth your time and means more money in your pocket if you grow microgreens to sell. You might even go into business selling slabs of various sizes. It's just not my thing. I hesitantly say if you just can't do it for whatever reason and just have to have some WickRock slabs, contact me and we'll discuss it.
Don't get in any hurry to cure your WickRock slabs. Pour into the tray, shake and bounce as we will get into in a bit and let them sit for a week. You can fill ten, 1010 trays as fast as you can mix the plaster to go in them and be done in a few hours.
I mix for each tray individually and recommend you do the same. Don't feel bad if you mess up a few while getting the hang of it. Maybe practice with smaller amounts. WickRock may be molded into any container you would normally use with any conventional grow media as long as it has holes for water to touch the gypsum.
Recipe for 1010 Tray WickRock Slab - 1/2" Thick...
Four cups DAP Plaster of Paris, unpacked.
1 3/4 Cups cold water. This is the minimum amount of water I recommend. A small bit over will not hurt and makes the plaster easier to work, about between 1 3/4 to 2 cups is maximum. Too much will affect final density and surface negatively. Cold water gives you a longer working time and is highly recommended.
Pour measured cold water into a large enough bowl to stir and work without spilling it. I use a 2 quart plastic bowl and metal soup spoon.
Sprinkle the four cups plaster into the water evenly, as much as will take up water and go ahead and dump the rest in.
Start mixing with a spoon. You don't have much time to waste. Get it as smooth as possible and pour into the center of the tray, scraping all the plaster you can out of the bowl.
An electric hand mixer is not good for this as it will introduce too many air bubbles. If you happen to be blessed enough to have a vacuum chamber and know how and what it's good for then you are golden.
An electric hand mixer is not good for this as it will introduce too many air bubbles. If you happen to be blessed enough to have a vacuum chamber and know how and what it's good for then you are golden.
Set the bowl aside and start shaking the tray around on a flat, hard surface. "Bouncing" it a little helps work air bubbles out. Don't worry too much over the tiny ones, just shake and bounce for a couple minutes and you will get most of the bubbles out and have a smooth surface. Setting your tray or container on a flat surface with bottom access is good for tapping underneath with a hammer to work the bubbles to the surface.
Leave it alone now and go wash the plaster left in the bowl out of the bowl before it sets up. An old wash cloth works well for this or a hose spray outside. Do not wash it down the sink or any drain in your home. If it's too cold outside, wash it out in a bucket of warm water.
Your WickRock slab will first harden a little, heat up and then cool. It is semi hard at this point but needs to fully cure for 72 hours for maximum hardness and durability.
Best to just leave it in the tray if you have enough trays but if not, wait until after the heat/cool cycle, about 20-30 minutes, then fold a towel and place it on a firm surface. Hold the tray upside down a few inches over the towel and drop it evenly. The slab will pop out, usually the first drop onto the towel if you use a tapered tray and will never pop out with a straight wall tray.
About trays. Depending on your preference, a very, very light coating of your choice of oil along the bottom inside edges of your tray will act to prevent "flashing" of the plaster, providing no trimming later and a nice clean edge. Just throwing that out there for some may or may not wish any kind of oil on their slab, organic certified or not.
You may elect to forever use your slab inside a tray. I like this method because slabs are much easier to seed if you have walls. Simply drill some holes in the tray bottom and apply packing tape to the outside prior to pouring. After cure, remove the tape. This will allow water to wick and very little depth of water is needed. You will want to experiment for your application.
My current tray vendor provides trays with and without holes. They are the same 1010 tray but with melted-in holes along the bottom edges and tray bottom. Not very neat and bumpy, makes it so the WickRock slab doesn't fit nice and snug when molding in one tray and setting into the holes tray. For this reason I drill my own clean holes and cover with tape for pouring. This tray and slab now match forever.


The WickRock slab may be used alone, two fitting in a standard 1020 tray or kept in a tray with holes as shown below. Water level to your preference. I prefer a little bit and adding some now and then versus a lot that doesn't get used up by the plants quickly. There is no set rule since plants take up different amounts of water at different times.

Two 1010 molded slabs set into a 1020 tray leaves exactly 1.5 inches gap in the center or at either end for monitoring water level, adding to or reaching in a picking up the slab easily.

It's fun and easy once you learn to mix different amounts to pour into other containers. This is Genovese Basil, day-4 after dry sowing onto WickRock molded into a vented deli container and set in a shallow tray of water. It was kept dark with a dark cloth over the tray. The tiny tails just starting to emerge.
Notice on this container I didn't use any oil along the inside walls versus the photo's above on the 1010 tray where a light coating of olive oil was used which produced the clean edge on the WickRock. Bouncing and shaking will cause flashing along inside wall.
Notice on this container I didn't use any oil along the inside walls versus the photo's above on the 1010 tray where a light coating of olive oil was used which produced the clean edge on the WickRock. Bouncing and shaking will cause flashing along inside wall.


Cured WickRock has a neutral pH and by the nature of gypsum, serves as a buffer which may or may not affect, improve or lessen the quality of your grows. You should experiment with your particulars and see how it goes with small crops before going big trays.
It can be heated in the oven to dry or disinfect between uses. Never go more hot than 200F and never remove hot into a cold room. Let it cool off inside the oven after the heat is turned off.
You may never have to top water with WickRock but will benefit in early stages with humidity covers. Each seed and seedling will take what it requires from the surface and the roots will form their own matting which may simply be lifted up off the WickRock surface, easily and cleanly.

Over-seeding or stacking of unsoaked seeds will prevent even germination since dry seeds need surface contact.
I'm not saying WickRock is the end all replacement for every type of Microgreen media or plant/seed type. If it will just help you realize cost and labor savings on one type of plant then it's worth you trying. I look forward to seeing and hearing your results in our Facebook Group, WickRock Microgreens. Come and join us!